

After running a structural calculation, choose File → Create Calculation Report... to open the Create Paperwork PDF dialog. The report documents the calculated model, selected loads, and results. Deflection values in the report use the Unit for dimensions in print from App Settings; for example, lengths can appear in meters and deflections in millimeters. Check the input data and the finished PDF. A report you create yourself is not an externally checked structural calculation. To request one, see Request a Checked Structural Calculation.
When Simple Review and Advanced Review are mentioned, they refer to the Simple Export and Advanced Export tabs in the current dialog. Both create a calculation report as a PDF. Simple Export assembles it from a predefined structure and selected result groups. Advanced Export lets you define the structure, text, and placeholders yourself in the Markdown editor.
| Mode | Suitable for | Formatting |
|---|---|---|
| Simple Export | A quick report with the standard sections you need. | Enter project information and a project description. Choose the result groups and, if needed, the current 3D view for the cover page. The project description supports Markdown, images, saved views, assembly sheets, and formulas; the remaining structure is assembled automatically. |
| Advanced Export | A custom order, additional explanations, and verification results placed exactly where you want them. | Write the report in Write, insert placeholders from the menus, and review the draft in Preview and with Update Report. Only here can you manage Saved Paperwork Reports. The AI Report Writer is on the left. |
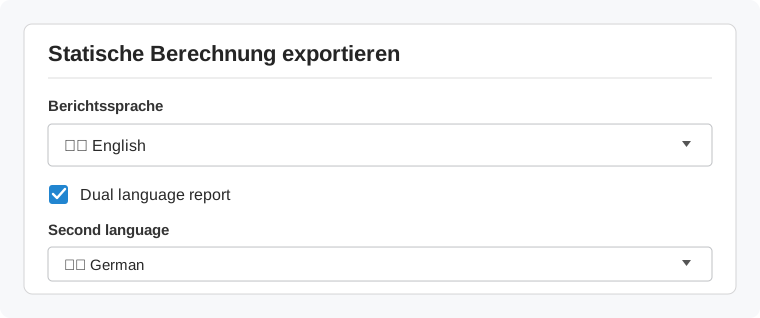
Advanced Export lets you write the report text yourself. The Dual language report option does not translate this Markdown text. Text you create with the AI Report Writer or enter in the project description also remains unchanged. Write such content in both languages yourself if needed.
The option applies to automatically generated report templates and text blocks in result placeholders. It applies to Simple Export and to automatically generated sections in Advanced Export. Formulas and result data are not inserted twice.
Automatically generated headings appear on one line, separated by a slash. The texts appear one below the other. A formula or shared result appears only once. For example:
An external AI assistant can create or revise a calculation report through the MCP connection. It receives the same writing instructions as the in-app AI Report Writer, along with the saved draft, project information, existing calculation results, and the names of available images, saved views, and assembly sheets. This data is made available to the connected AI client. The AI Report Writer's API key and chat history are not transferred. For this workflow, you use your external client's AI access; the openAI_key.txt file is not required.
LR_GetStructuralReportContext. If your client supports selectable MCP prompt templates, you can instead choose structural_report and enter your request there. The template assembles instructions and data; the connected AI assistant writes the text.The external client decides how to use the supplied instructions. The connection does not replace its own system instructions. A generated report remains a proposal to be reviewed and is not an externally checked structural calculation. After updating Production Assist, you may need to restart the application and renew the MCP connection so your client recognizes the new commands and prompt templates.
**Reference Span / Portée de référence**

$$
L=500\,\mathrm{cm}
$$

The deflection ratio is calculated as follows:
Le rapport entre la portée et la flèche maximale est calculé comme suit :

$$
\frac{L}{f_\mathrm{max}}=\frac{500}{2}=250
$$

The deflection therefore corresponds to L/250.
La flèche correspond donc à L/250.
The second language setting applies to the current preview and PDF export. It is not saved with the Markdown draft.
In Simple Export, the result groups for hoists, drops, ground support, wind loads, floor loads, and cross sections, as well as Add Current 3D View to Cover Page, are enabled initially. Turn off any groups you do not need. In Advanced Export, under Saved Paperwork Reports, you can select an existing template or save your own with Create Preset. Update Preset applies later changes; Delete Preset removes the selected template.
Markdown is plain text with a few formatting characters. A line beginning with # starts a large heading; ## starts a subheading. **Text** is bold, and *Text* is italic. A list starts with -, a link has the form [Text](target), and an image has the form . A table needs a header row and a separator row, for example:
| Field | Value |
| --- | --- |
| Project | %%PROJECT_NAME%% |
| Location | %%VENUE_NAME%% |
Leave a blank line between headings, text blocks, tables, and report commands. In Write, edit the source text; Preview shows the Markdown formatting. Update Report rebuilds the report preview with the current data. The toolbar lets you insert formatting, an existing or imported image, a saved view, an assembly sheet, or a formula. When you import an image, its name is inserted in the text as ; for your own images, it is best to use the editor's image picker so the name is correct.
Bulleted and numbered lists remain lists in the report preview and the PDF. For numbered lists, write, for example, 1. First step and 2. Second step on separate lines. You can also use a different starting number. Indent nested lists and additional paragraphs enough for them to begin under the text of the parent item. In the PDF, bullets or numbers appear to the left of the text; wrapped lines stay aligned at the same text level.
1. Check the model
   - Check the loads
   - Check the supports
2. Start the calculation
To add a formula, click Formula, enter the expression in the Formula editor or use the on-screen math keyboard, then click Insert. The editor inserts a standalone LaTeX formula between two $$ lines. You can also write it yourself:
$$
F = m \cdot a
$$
For an inline formula, you can use $F = m \cdot a$. Check how it appears in the finished PDF. The preview in the editing tab does not show every PDF effect or every result section in full.
When the report is generated, placeholders are replaced with drawing data, calculation results, or PDF elements. Type each one exactly as shown, including the %% at the beginning and end. Put section commands such as %%HOIST_RESULTS%% or %%SHEETBREAK%% on a line of their own. Where possible, insert named views and assembly sheets from the toolbar so their names are correct. Replace any name, object identifier, property value, or script name in parentheses with the actual value from your project.
The menus in Advanced Export provide the most commonly used result and PDF placeholders. The table also lists other variants supported by PDF export. SCOPED expects the string identifier of a parent drawing object and limits the output to its child objects. Most FILTERED commands expect two consecutive arguments in quotation marks, for example %%HOIST_RESULTS_FILTERED("Department","Rigging")%%. Use the property name as it appears in Object Properties. If the property or value does not match, the section remains empty. The cross-section filters for TRUSS_RESULTS are different: they take exactly one existing cross-section name without quotation marks, such as %%TRUSS_RESULTS_FILTERED(TSG)%%. Replace the property, filter text inserted by the editor for these two commands. The menu text for GROUND_SUPPORT_RESULTS_SCOPED currently omits the closing %%; add it to the inserted command.
| Placeholder | Effect in the report |
|---|---|
%%SHEETBREAK%% | Starts a new PDF page. |
%%LINEBREAK%% | Inserts a line break. |
%%TOC(3)%% | Inserts a table of contents; the number sets the heading depth to include. |
%%QR_CODE_PROJECT%% | Inserts a QR code for the online project. A matching online project must exist. |
%%QR_CODE_CALCULATION%% | Inserts a QR code for the online calculation view. A matching online project must exist. |
%%QR_CODE_WORKSHEET(Name)%% | Inserts a QR code for the named assembly sheet. Check its online destination. |
%%QR_CODE_OBJECT(ObjectID)%% | Inserts a QR code for the object with this string identifier. |
%%TEMPLATE_WORKSHEETS(Template)%% | Inserts assembly sheets whose properties table uses the named template. |
%%WORKSHEET(Name)%% | Inserts the named assembly sheet. |
%%ACAD_LAYOUT(Name)%% | Inserts the named AutoCAD layout, if the integration provides it. |
%%SAVED_VIEW(Name, ,100,100,)%% | Inserts the named saved view; the width and height here are each 100 mm. Use ---- instead of Name to insert the current view. |
%%ERRORS%% | Inserts the structural calculation errors. |
%%FEM_APPENDIX%% | Inserts the FEM appendix with information about calculated nodes. |
%%HOIST_RESULTS%% | Inserts the hoist results. |
%%DROP_RESULTS%% | Inserts the drop results. |
%%BRIDLE_RESULTS%% / %%BRIDLE_RESULTS_NO_LEGS%% | Inserts bridle results with or without individual legs. |
%%GROUND_SUPPORT_RESULTS%% | Inserts the ground support results. |
%%TRUSS_RESULTS%% / %%TRUSS_RESULTS_WITH_ROPES%% | Inserts cross-section results without or with attached ropes. |
%%LOAD_OVERVIEW%% / %%LOAD_OVERVIEW_VENUE%% | Inserts the load overview, or a separate overview for each connected structural system. |
%%LOAD_OVERVIEW_EC%% / %%LOAD_OVERVIEW_USABILITY%% / %%LOAD_OVERVIEW_TIPPING%% | Inserts the load overview for the active strength, serviceability, or overturning combination. |
%%LOAD_COMBINATION%% | Inserts the active load combination and, if they are separate, the active serviceability and overturning combinations. |
%%LOAD_COMBINATION_EC%% / %%LOAD_COMBINATION_USABILITY%% / %%LOAD_COMBINATION_TIPPING%% | Inserts the corresponding active load combination individually. |
%%WIND_LOAD_COMBINATION%% / %%WIND_LOAD_OVERVIEW%% | Inserts the wind load combination or wind load overview. |
%%FLOOR_SUPPORT_RESULT%% | Inserts calculated floor-support positions and floor loads. |
%%WORKLOAD_ALL_BEAMS%% | Inserts a table of calculated beams with their cross section, maximum utilization, and utilization type. |
%%TRUSS_DATA_APPENDIX%% | Inserts the truss data appendix. |
%%SCRIPT_PROVE_CHECK(ScriptName)%% | Runs the named script-based verification and inserts its log and a success or failure icon. The script must be available in the account's or online project's checks and enabled for the subscription plan. If you do not have permission, a license notice appears; the report may show a failed verification. See Script-Based Verifications. |
%%HOIST_RESULTS_SCOPED(ObjectID)%% / %%DROP_RESULTS_SCOPED(ObjectID)%% | Limits hoist or drop results to child objects. |
%%BRIDLE_RESULTS_SCOPED(ObjectID)%% / %%BRIDLE_RESULTS_SCOPED_NO_LEGS(ObjectID)%% | Limits bridle results to child objects; the second variant omits individual legs. |
%%GROUND_SUPPORT_RESULTS_SCOPED(ObjectID)%% / %%LOAD_OVERVIEW_SCOPED(ObjectID)%% | Limits ground support results or the load overview to child objects. |
%%TRUSS_RESULTS_SCOPED(ObjectID)%% / %%TRUSS_RESULTS_WITH_ROPES_SCOPED(ObjectID)%% | Limits cross-section results to child structural members; the second variant includes attached ropes. |
%%HOIST_RESULTS_FILTERED("Property","Value")%% / %%DROP_RESULTS_FILTERED("Property","Value")%% | Filters hoist or drop results by property and value. |
%%BRIDLE_RESULTS_FILTERED("Property","Value")%% / %%BRIDLE_RESULTS_FILTERED_NO_LEGS("Property","Value")%% | Filters bridle results; the second variant omits individual legs. |
%%GROUND_SUPPORT_RESULTS_FILTERED("Property","Value")%% / %%LOAD_OVERVIEW_FILTERED("Property","Value")%% | Filters ground support results or the load overview by property and value. |
%%TRUSS_RESULTS_FILTERED(CrossSectionName)%% / %%TRUSS_RESULTS_WITH_ROPES_FILTERED(CrossSectionName)%% | Filters cross-section results by cross-section name; the second variant includes attached ropes. |
You can also use these placeholders within a sentence or Markdown table. If the source data is empty or has not been filled in, the report will not contain useful information, so check the finished report.
| Placeholder | Value inserted |
|---|---|
%%STAND_NAME%% | Name of the current partial drawing. |
%%PROJECT_NAME%% | Project name. |
%%VENUE_NAME%% | Venue name. |
%%VENUE_STREET%% / %%VENUE_NUMBER%% | Venue street or house number. |
%%VENUE_POSTAL_CODE%% / %%VENUE_CITY%% / %%VENUE_COUNTRY%% | Venue postal code, city, or country. |
%%IMPRESSUM%% | Legal notice or additional project information. |
%%PROJECT_MANAGER%% | Value from Project Manager. |
%%COMPANY_NAME%% | Name of the company associated with the project. |
%%USER_NAME%% | Name of the currently signed-in user. |
%%REPORTER_NAME%% | Value from User responsible for structural calculation. |
%%PROGRAM_VERSION%% / %%PROGRAM_BUILD%% | Program version or build number. |
%%CURRENT_DATE%% / %%CURRENT_TIME%% | Date or time when the PDF is generated. |
%%PROJECT_DATE%% | Event date. |
%%CONSTRUCTION_DATE%% / %%DISMANTLE_DATE%% | Construction or dismantling date. |
Open Advanced Export. For a test, replace the existing draft in Write with the example below, then adapt the text and sections to your model. The bracketed details are intentionally left for you to fill in manually. Remove result sections for which your project has no data.
# Calculation Report: %%PROJECT_NAME%%

| Field | Value |
| --- | --- |
| Venue | %%VENUE_NAME%% |
| Responsible person | %%REPORTER_NAME%% |
| Date | %%CURRENT_DATE%% |

## Project Description

[Describe the structure, dimensions, load assumptions, and intended use here.]

## Load Combinations

%%LOAD_COMBINATION%%

## Load Overview

%%LOAD_OVERVIEW%%

## Hoist Results

%%HOIST_RESULTS%%

## Cross-Section Verifications

%%TRUSS_RESULTS%%

%%SHEETBREAK%%

## Appendix

%%FEM_APPENDIX%%
Click Update Report, then click OK to inspect the PDF. For example, add a table of contents with %%TOC(3)%%. Use the editor's insertion function for drawing views and assembly sheets; it inserts the name of the existing item.
Use a label template as a PDF page background for a header, company logo, footer, or designed cover. Create one under Window → Resource Manager → Labels & Background. Set the paper and label sizes to match the PDF, add text fields, a logo, and other design elements, then exit edit mode. For the full procedure, see Use a Label as a Document Background; Create and Print Labels explains fields and logo design.
In the report dialog, choose a template for following pages under Background Template and, if needed, a different cover template under First Page Background Template.
The AI Report Writer appears on the left in Advanced Export. It receives the current report draft and drawing data as context and can suggest new Markdown text in response to your request. Give it specific details such as the project location, structure type, dimensions, indoor or outdoor setting, load assumptions, and report sections you want. The initial prompt asks for this information. A code block shown as Suggested Report can be transferred to the draft with Update Report. This replaces the existing Markdown text. Review the draft before accepting it, then check the placeholders, facts, and calculation results.
The desktop app needs a valid OpenAI API key and internet access to connect. The current app has no settings dialog or model selector for this feature. When the AI Report Writer opens, the app reads the key from a file in its user data folder.
openAI_key.txt in the Production Assist user data folder. For a standard macOS installation, this is usually ~/Library/Application Support/ProductionAssist/openAI_key.txt. The user data folder is not the project folder or the folder containing the application executable; its location may differ for a customized installation.Without a key, the chat reports that configuration is missing. If an API error occurs, the chat displays the error message. The key is used to send requests to the OpenAI API. Do not share it or include it in the report. AI-generated text is only a suggestion; it does not replace reviewing the model and calculation checks or obtaining any required external review.